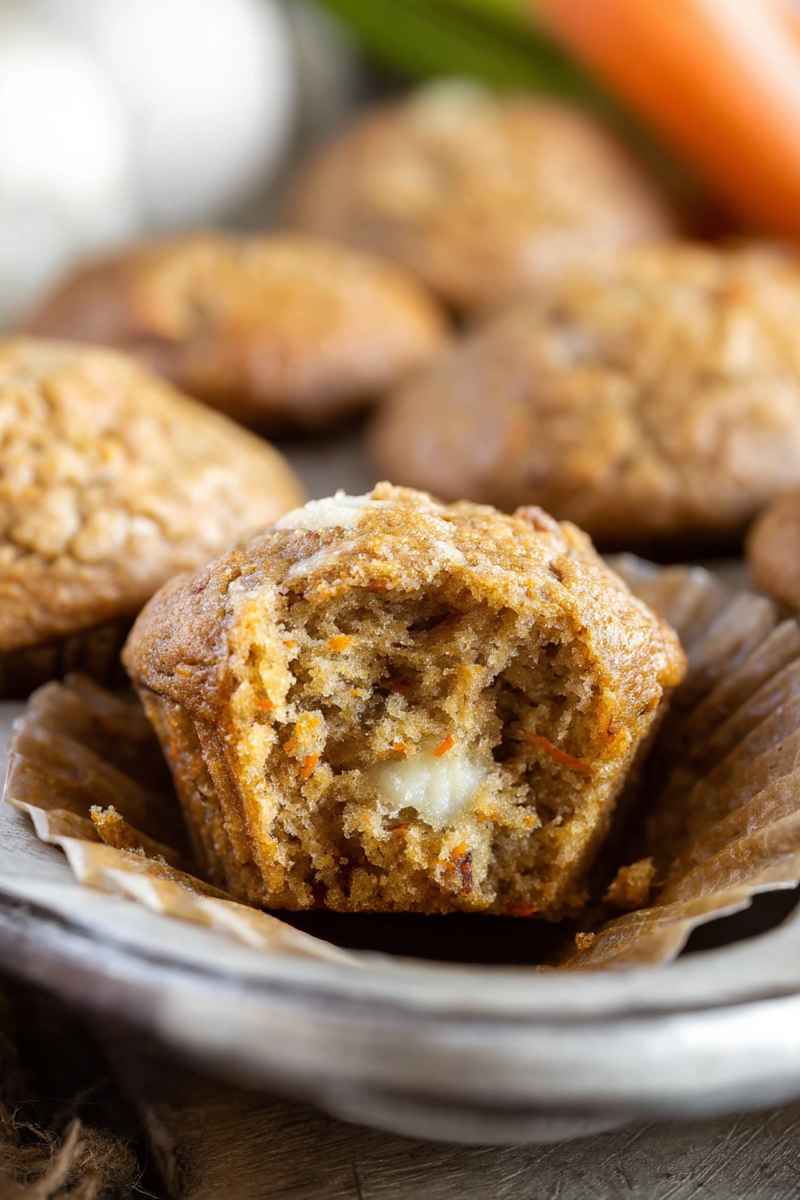
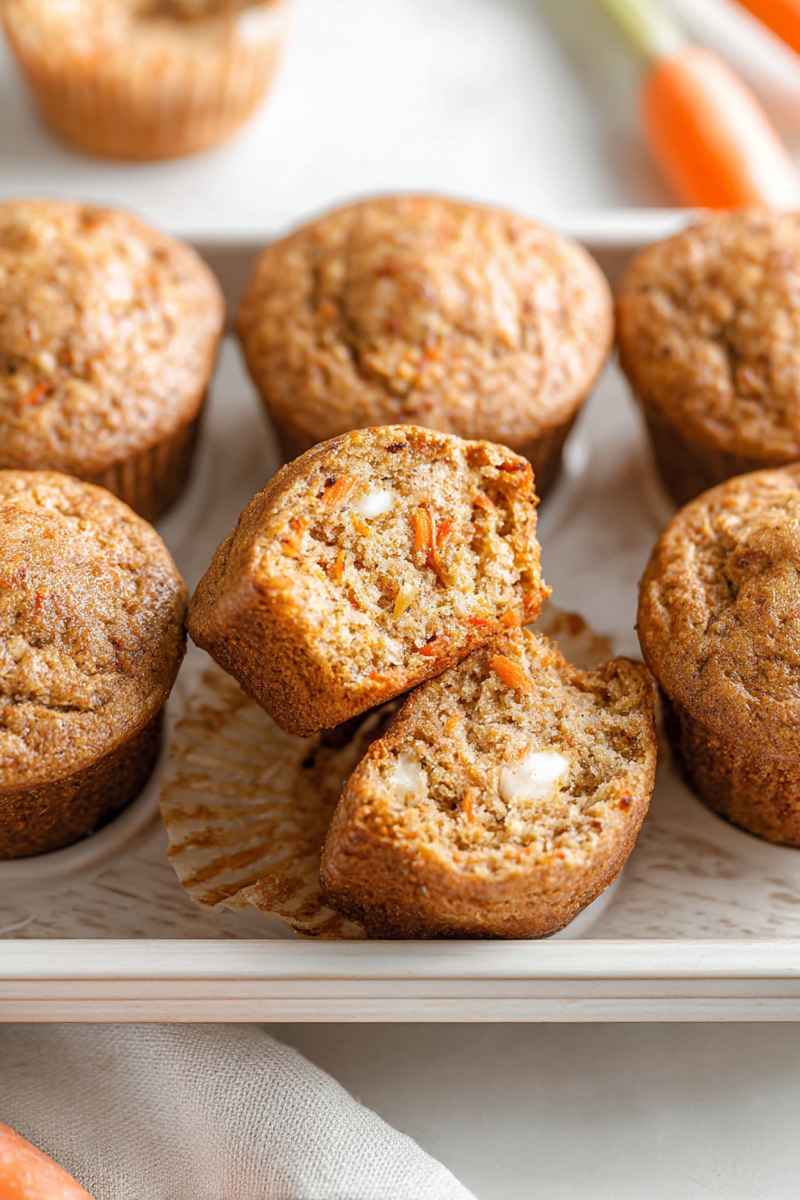
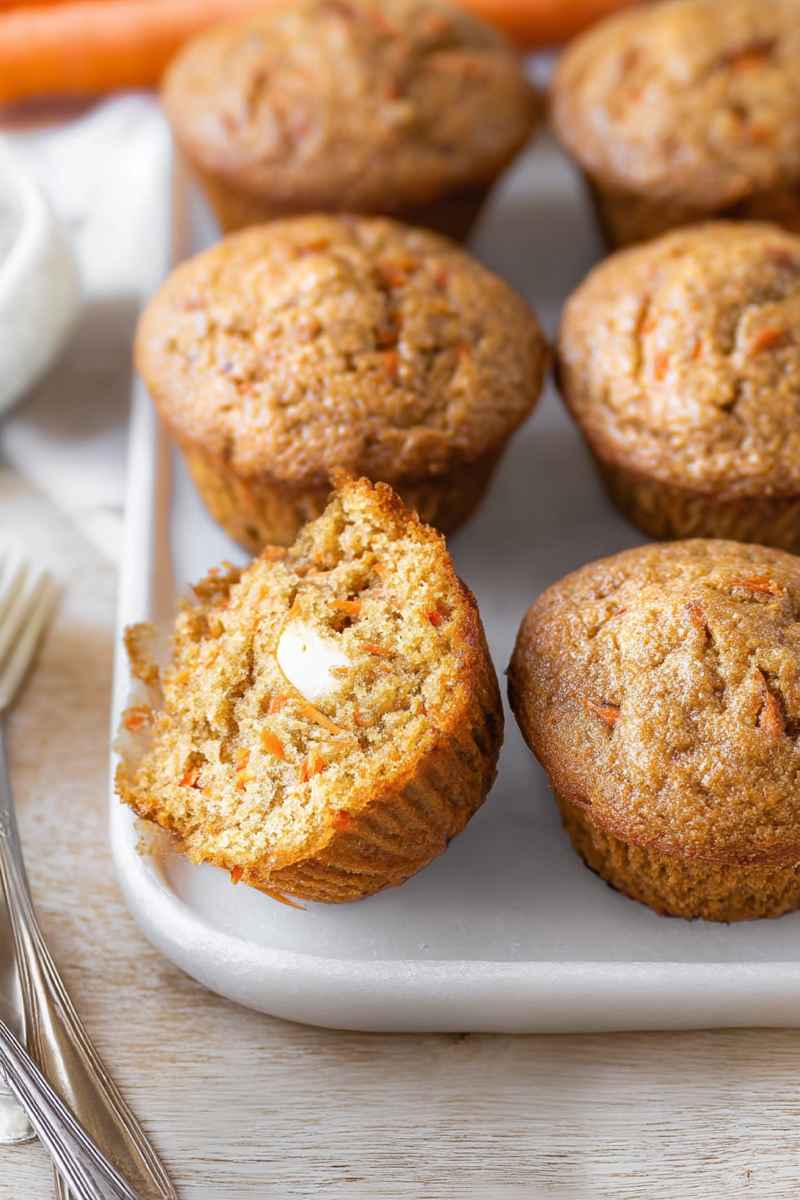
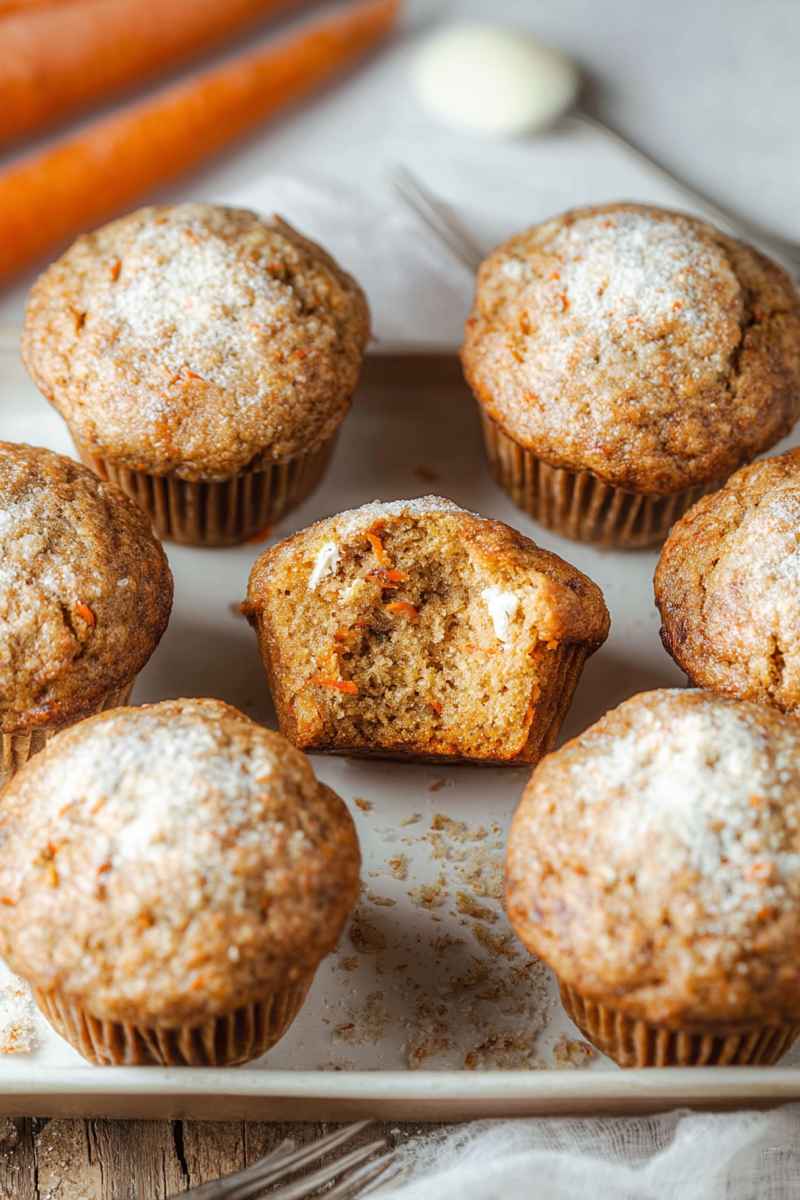
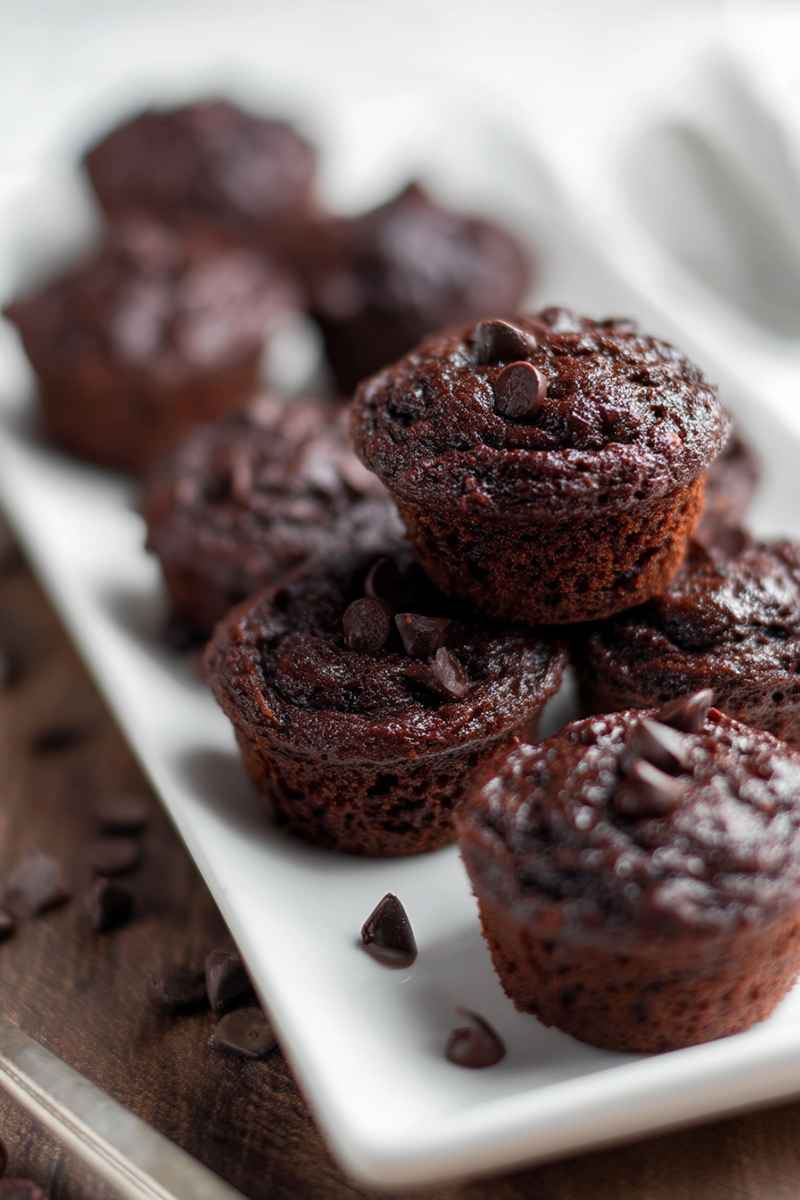
These carrot cake muffins with cream cheese filling are incredibly soft and bursting with warm spice flavor, each holding a wonderful surprise center of creamy, tangy goodness. I spent time perfecting this recipe to get just the right balance of moist crumb and rich filling, so you can bake bakery-style muffins easily at home. They are perfect for a cozy morning treat, a delightful afternoon snack, or even a simple dessert.
Why You Will Adore These Carrot Cake Muffins
I know you will fall in love with this recipe for so many great reasons.
- They are wonderfully soft and moist inside.
- They feature a dreamy cream cheese filling hidden right in the middle.
- This recipe uses ingredients you likely already have on hand.
- It is a fantastic way to use up those extra carrots.
Simple Goodness Ingredients for These Muffins
Making these delicious carrot cake muffins requires just a few basic kitchen staples. You can find the exact amounts needed listed below in the full recipe details.
- All purpose flour you can measure using the spoon and level method or by weight.
- Granulated sugar for sweetness.
- Light brown sugar packed firmly adds moisture and a hint of caramel flavor.
- Baking powder to help them rise beautifully.
- Fine salt enhances all the flavors.
- Ground cinnamon for classic carrot cake warmth.
- Ground ginger adds a subtle spicy note.
- Ground nutmeg brings a comforting aroma.
- Ground cloves for depth of flavor.
- Large eggs bind everything together.
- Buttermilk makes the muffins incredibly tender.
- Vegetable oil contributes to the moist texture.
- Vanilla extract adds essential flavor.
- Freshly grated carrots are the star ingredient.
- Cream cheese make sure it is softened properly.
Getting Your Flour Right Every Time
Measuring flour correctly is one key step to achieving perfect muffins. The most accurate way to measure flour is by using a kitchen scale to weigh it in grams.
If you do not have a kitchen scale, you can follow this simple method.
- Fluff the flour. Flour in the bag or container settles and becomes dense. Use a whisk or spoon to lightly stir the flour in its container. This is sometimes called aerating. Do not sift the flour unless a recipe specifically tells you to.
- Spoon the flour into your measuring cup. Gently use a spoon to scoop the fluffed flour and let it pile into the measuring cup. Avoid tapping the cup against the counter. Tapping packs the flour down again.
- Level it off. Use the straight edge of a butter knife or similar tool to scrape across the top of the measuring cup, leveling off the excess flour.
Whipping Up These Delicious Treats
Making these delightful carrot cake muffins with their surprise cream cheese center is straightforward. Follow these steps for fantastic results.
Prepare the Muffin Batter
First, we will get the flavorful carrot cake batter ready.
- Grate your carrots. Use a box grater or a cheese grater to grate the carrots. You will need precisely two cups of grated carrots for this recipe.
- Combine the dry ingredients. In a medium mixing bowl, measure out the all purpose flour, granulated sugar, brown sugar, baking powder, salt, cinnamon, ginger, nutmeg, and cloves. Stir these dry ingredients together thoroughly with a spoon. Set this bowl aside for just a moment.
- Mix the wet ingredients. In a separate, larger mixing bowl, whisk together the eggs, buttermilk, vegetable oil, and vanilla extract. You can stir these wet ingredients together with a spatula to combine them, or you can use an electric mixer on a low speed setting for about 30 seconds.
- Blend the batter. Gradually add the bowl of dry ingredients into the bowl with the wet ingredients. Mix the batter only until you see that the dry ingredients are just incorporated into the wet. Be very careful not to overmix at this stage.
- Gently add the carrots. Use a spatula to gently fold the grated carrots into the batter. The batter will be quite thick, which is perfectly normal.
- Let the batter rest. Cover the bowl of batter with a clean kitchen towel. Allow the batter to sit and rest for 15 minutes. While the batter is resting, you can preheat your oven to 425 degrees Fahrenheit (220 degrees Celsius) and prepare the cream cheese filling.
Create the Cream Cheese Layer
This creamy filling is easy to prepare while the muffin batter rests.
- Beat the cream cheese. Place the softened cream cheese, which should be at room temperature, into a mixing bowl. Use an electric mixer to beat the cream cheese by itself for one to two minutes until it becomes smooth and creamy.
- Finish the mixture. Add the large egg yolk, granulated sugar, and vanilla extract into the bowl with the beaten cream cheese. Continue beating everything together until all the ingredients are fully combined and the mixture is uniform.
- Chill the filling. Take the bowl containing the cream cheese mixture and place it into the freezer. Leave it in the freezer while you finish preparing the remaining parts of the recipe. Chilling the filling like this is a helpful trick because it prevents the filling from completely melting and disappearing into the muffins as they bake.
Assembling Your Muffins Just Right
Now that the batter has rested and the cream cheese filling is chilled, it is time to bring these delicious components together in the muffin pan. This assembly method is key to getting the filling tucked neatly inside.
- Line your muffin tin. After the 15 minute resting period for the batter is complete, take your muffin tin and line each cup with paper liners.
- Add a small amount of batter. Spoon just one to two tablespoons of the prepared muffin batter into the bottom of each paper-lined muffin cup. This creates the base layer for your filling.
- Place the cream cheese filling. Next, carefully add one to two tablespoons of the cold cream cheese mixture directly on top of the small amount of batter you just placed in each cup.
- Top with more batter. Finally, spoon more muffin batter over the top of the cream cheese filling in each cup. Continue adding batter until the cups are filled all the way to the very top. Filling them generously like this is important for achieving those lovely tall muffin tops later. Starting with only a small amount of batter on the bottom before adding the filling helps ensure the cream cheese stays mostly contained within the muffin as it bakes. If the filling is placed too high, it might bubble out the top.
- Add optional topping. If you like, you can sprinkle the tops of the filled muffin cups with some coarse sanding sugar before baking. This adds a nice sparkle and a little crunch.
- Begin baking at a high temperature. Place the muffin tin into your preheated 425 degrees Fahrenheit (220 degrees Celsius) oven. Bake them at this initial high temperature for exactly 7 minutes. Do not take the muffins out of the oven after this time.
- Reduce the heat and finish baking. After the first 7 minutes are up, turn the oven temperature down to 350 degrees Fahrenheit (175 degrees Celsius). Keep the muffins in the oven and continue baking for another 12 to 15 minutes. You will know the muffins are done when you can insert a toothpick into the center of a muffin, and it comes out clean with no wet batter attached.
- Let them cool properly. Allow the baked muffins to cool inside the muffin pan for at least 15 minutes before you try to remove them. Sometimes the cream cheese filling might create a slightly hollow space inside the muffin as it melts and then cools. Freezing the cream cheese filling ahead of time, as we did, helps to minimize this effect.
- Bake remaining batter if needed. If you have more muffin batter left, repeat the baking process with a second batch. Remember to raise the oven temperature back up to 425 degrees Fahrenheit (220 degrees Celsius) again for the first 7 minutes of baking before lowering it to 350 degrees Fahrenheit (175 degrees Celsius) to finish.
Helpful Tips for Perfect Carrot Cake Muffins
Making delicious muffins is easy when you keep a few simple tips in mind. These little tricks can really elevate your results.
- Measure flour accurately. Getting the right amount of flour is crucial for texture. Always measure flour using the spoon and level method or, even better, weigh it with a kitchen scale for the most consistent results.
- Use baking powder. This recipe specifically calls for baking powder as the leavening agent. Do not substitute baking soda for baking powder in this recipe, as it will affect the rise and texture.
- Stick with buttermilk. For the best possible tender crumb and tangy flavor, it is recommended to use buttermilk. This specific recipe was developed using buttermilk and has not been tested with regular milk or non dairy alternatives.
- Let the batter rest. Allowing the muffin batter to rest for 15 minutes after mixing and before scooping is a simple step that makes a big difference. This resting period allows the flour to fully absorb the liquids, which helps create a better texture and aids in achieving taller tops.
- Start with high heat. Baking the muffins at a higher temperature initially (425 degrees Fahrenheit) helps give them a quick burst of lift. Then, reducing the temperature allows them to bake through evenly without burning the tops. This method contributes significantly to getting those lovely, domed bakery-style tops. Keep reading for more details on creating those beautiful muffin crowns.
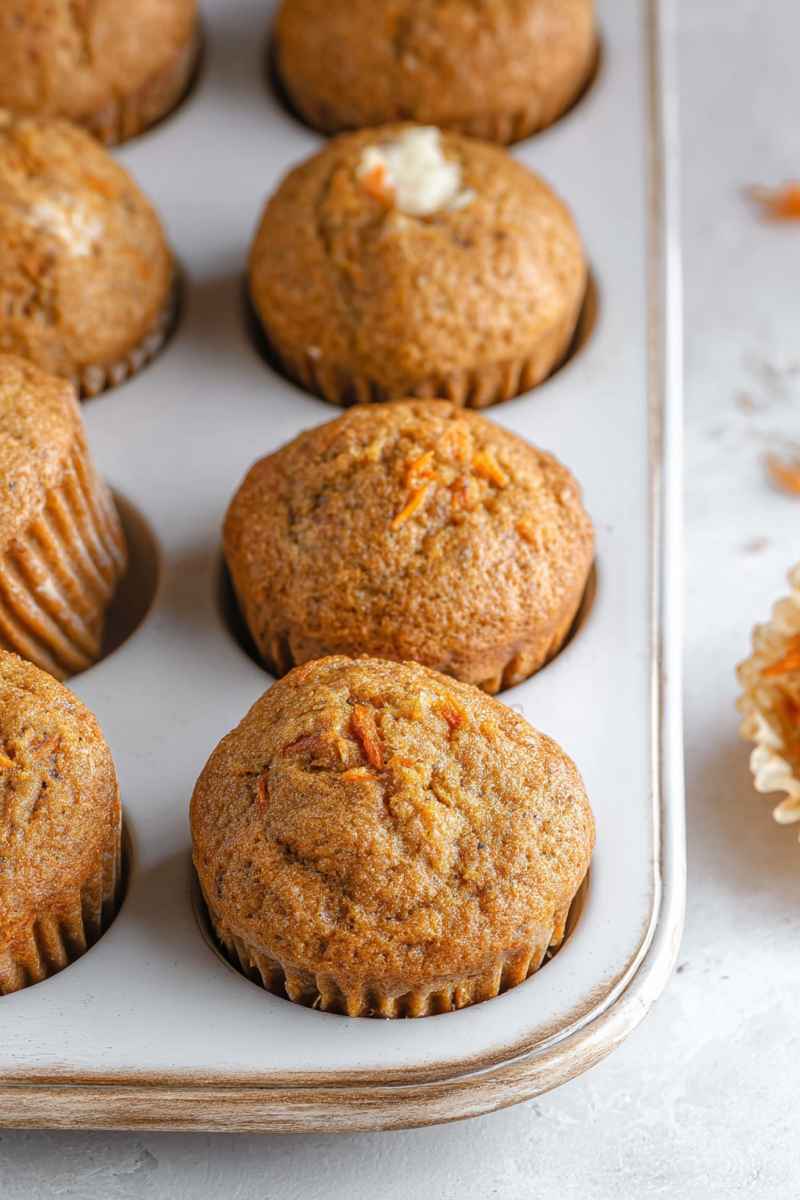
Achieving Those Coveted Bakery-Style Muffin Tops
Everyone loves a muffin with a beautifully domed top just like you would find in a bakery. It adds to the visual appeal and often means a great texture. I have a few tricks I use to help these muffins rise high and mighty.
- The Resting Period is Your Friend. As mentioned earlier, letting the batter rest for 15 minutes after mixing is important. During this short rest, the starch molecules in the flour start soaking up the liquid in the batter. This absorption makes the batter thicker and less likely to spread out sideways in the oven. A thicker batter is better able to push upwards as it bakes.
- Bake Smartly with Two Temperatures. This is a key technique. You bake the muffins at a high temperature (425 degrees Fahrenheit) for the first 7 minutes, then immediately lower the oven temperature to 3 standard 50 degrees Fahrenheit to finish baking. The initial blast of high heat causes the outside of the muffin batter to set quickly while the inside continues to rise rapidly. This forces the batter upwards, creating that desirable dome shape.
- Do Not Be Shy, Fill Them Up. This might sound counterintuitive if you are used to only filling muffin cups two thirds full, but for bakery style tops, you need to fill your muffin liners generously, all the way to the very top. This provides enough batter mass to support a strong upward rise.
- Bonus Trick Use Every Other Cup. This is a game changer for getting perfectly shaped, large muffin tops especially if you are using a standard 12 cup muffin pan. Instead of filling all 12 cups sequentially, place liners in and fill only 6 cups, skipping a cup in between each one you fill. This gives the muffins more space to expand and dome upwards without bumping into their neighbors. It also allows for better air circulation, which helps the tops brown beautifully.
Ideas for Swaps and Changes
While this recipe is perfect as is, you can certainly make a few simple adjustments based on your preferences or what you have on hand.
- Make them gluten free. I have had excellent results making these muffins using a cup for cup gluten free flour blend in place of the all purpose flour. It is a simple one to one substitution.
- Add some nuts. If you are a fan of nuts in your carrot cake, feel free to fold in about half a cup of chopped pecans or walnuts along with the grated carrots. They add a nice crunch and classic flavor.
- Skip the filling, add frosting. If you prefer, you can omit the cream cheese filling inside the muffins. Once they are baked and cooled, you can frost the tops generously with your favorite cream cheese frosting instead.
Questions You Might Have
Here are answers to some common questions about making these carrot cake muffins with cream cheese filling.
These muffins are best stored in the refrigerator because of the cream cheese filling. Keep them in an airtight container to maintain freshness.
When stored properly in an airtight container in the refrigerator, these carrot cake muffins will last for about 4 to 5 days.
Yes, these muffins freeze wonderfully. Wrap each muffin individually in plastic wrap. For extra protection, place the wrapped muffins in a freezer safe bag or airtight container.
You can thaw frozen muffins by leaving them on the counter at room temperature for a few hours. If you are in a hurry, you can warm them gently in the microwave for 15 second intervals until they are thawed and warm.
You should use fresh whole carrots that you grate yourself. Pre shredded carrots can sometimes be a bit dry and do not provide the same moisture as freshly grated carrots.
This can happen if the cream cheese filling was not cold enough before baking. Make sure to chill the filling in the freezer while you prepare the batter. Starting with a small amount of batter in the bottom of the cup before adding the filling also helps keep it centered.
Yes, you can likely substitute other neutral oils like canola oil or grapeseed oil. Melted unsalted butter might also work but could slightly change the texture.
Carrot Cake Muffins with Cream Cheese Filling
- Prep Time: 15 minutes
- Cook Time: 30 minutes
- Total Time: 45 minutes
- Yield: 15 muffins
- Category: Muffins
- Method: Oven
Description
These Carrot Cake Muffins with Cream Cheese Filling are incredibly moist and flavorful, packed with sweet grated carrots and warm spices, featuring a delightful surprise pocket of creamy, tangy cream cheese inside! They are truly irresistible and perfect for any time of day!
Ingredients
For the Cream Cheese Layer
- 8 ounces (230 grams) full-fat cream cheese, softened to room temperature
- 1 large egg yolk
- 1/2 cup (100 grams) granulated sugar
- 2 teaspoons vanilla extract
For the Muffins
- 2 ½ cups (310 grams) all purpose flour
- 1 cup (200 grams) granulated sugar
- ½ cup (100 grams) packed light brown sugar
- 2 teaspoons baking powder
- ½ teaspoon fine salt
- 1 ½ teaspoons ground cinnamon
- ¼ teaspoon ground ginger
- ¼ teaspoon ground nutmeg
- ⅛ teaspoon ground cloves
- 2 large eggs
- ¾ cup (180 ml) buttermilk
- ½ cup (120 ml) vegetable oil
- 1 teaspoon vanilla extract
- 2 cups (200 grams) grated carrots
Instructions
For the Cream Cheese Layer
- Put the cream cheese that is at room temperature into a mixing bowl. Use an electric mixer to beat it for one to two minutes until it is smooth.
- Add the egg yolk, sugar, and vanilla extract. Continue beating until everything is fully combined.
- Place the bowl containing the cream cheese mixture into the freezer. Leave it there while you prepare the remaining parts of the recipe. Chilling the filling helps prevent it from melting completely into the muffins as they bake.
For the Muffins
- Use a box grater or a cheese grater to grate your carrots. Measure out exactly two cups of grated carrots.
- In a mixing bowl, combine the all purpose flour, granulated sugar, brown sugar, baking powder, salt, cinnamon, ginger, nutmeg, and cloves. Stir these dry ingredients together with a spoon until they are well mixed. Set this bowl aside for now.
- In a larger separate mixing bowl, whisk together the eggs, buttermilk, vegetable oil, and vanilla extract. Stir these wet ingredients with a spatula to combine or beat them with an electric mixer on a low speed setting for about 30 seconds.
- Gradually add the dry ingredients from the first bowl into the wet ingredients. Mix the batter only until the dry ingredients are just combined with the wet. Do not overmix.
- Use a spatula to gently fold in the grated carrots. The muffin batter will be quite thick at this stage.
- Cover the bowl of batter with a clean towel. Let the batter sit and rest for 15 minutes. While the batter rests, preheat your oven to 425 degrees Fahrenheit (220 degrees Celsius).
Assemble
- After the 15 minute resting period is finished, line a muffin tin with paper liners. Fill each muffin cup with only one to two tablespoons of the prepared muffin batter.
- Next, add one to two tablespoons of the cold cream cheese mixture on top of the small amount of batter in each cup.
- Finally, top each muffin cup with more muffin batter. Fill the cups all the way to the very top. It is important to start with just a small amount of batter before adding the cream cheese filling. If the cream cheese filling is placed too high in the cup, it might ooze out the top while baking.
- Optionally, you can sprinkle the tops of the filled muffin cups with sanding sugar for a sparkling finish.
- Place the muffin tin in the preheated 425 degrees Fahrenheit (220 degrees Celsius) oven and bake for 7 minutes. Do not remove the muffins from the oven.
- After the initial 7 minutes, turn the oven temperature down to 350 degrees Fahrenheit (175 degrees Celsius). Continue baking for another 12 to 15 minutes. You will know they are done when a toothpick inserted into the center of a muffin comes out clean.
- Let the baked muffins cool inside the muffin pan for at least 15 minutes before you attempt to remove them. Sometimes the cream cheese filling may create a slightly hollow space inside the muffin as it melts. Freezing the cream cheese filling ahead of time can help minimize this effect.
- If you have more batter, repeat the baking process with a second batch. Remember to raise the oven temperature back up to 425 degrees Fahrenheit (220 degrees Celsius) again for the first 7 minutes before lowering it to 350 degrees Fahrenheit (175 degrees Celsius).
Notes
- Ingredient Measurement: It is best to measure your flour accurately. Use the spoon and level method by gently spooning flour into your measuring cup and leveling the top with a straight edge, or weigh the flour using a kitchen scale for the most precise result.
- Gluten Free Option: These muffins work well with gluten free flour blends too. I have had great success using a cup-for-cup gluten free flour blend as a direct substitute for the all purpose flour in this recipe.
- Bakery Style Tips: For muffins that look and feel like they came from a bakery, follow these simple tips.
- Let the batter rest after mixing for 15 minutes before scooping it into your muffin pan. This resting period helps the gluten relax and improves the texture.
- Bake the muffins initially at a high temperature, 425 degrees Fahrenheit (220 degrees Celsius), then reduce the temperature to 350 degrees Fahrenheit (175 degrees Celsius) to finish baking. This temperature change helps create those nice tall muffin tops.
- Fill your muffin liners generously, all the way to the top. This allows the batter to rise properly and form a beautiful domed top.
- If you are using a standard 12-cup muffin pan, try filling every other cup rather than filling them all consecutively. This technique gives the muffins more space to spread outwards slightly as they rise, encouraging better shape and browning on the tops.
Nutrition
- Serving Size: 1 muffin
- Calories: 335kcal
- Sugar: 30g
- Sodium: 220mg
- Fat: 15g
- Carbohydrates: 47g
- Fiber: 2g
- Protein: 5g
- Cholesterol: 40mg
Very good article! We are linking to this particularly great content on our website.
Keep up the good writing.
I’m amazed, I have to admit. Rarely do I come across a blog that’s both equally educative and engaging, and without a doubt, you’ve hit the nail on the head.
The problem is something which too few folks are speaking intelligently
about. Now i’m very happy I came across this in my search for something regarding
this.
Hey! This post could not be written any better! Reading through this post
reminds me of my good old room mate! He always kept talking about this.
I will forward this page to him. Pretty sure he will have a good read.
Thank you for sharing!