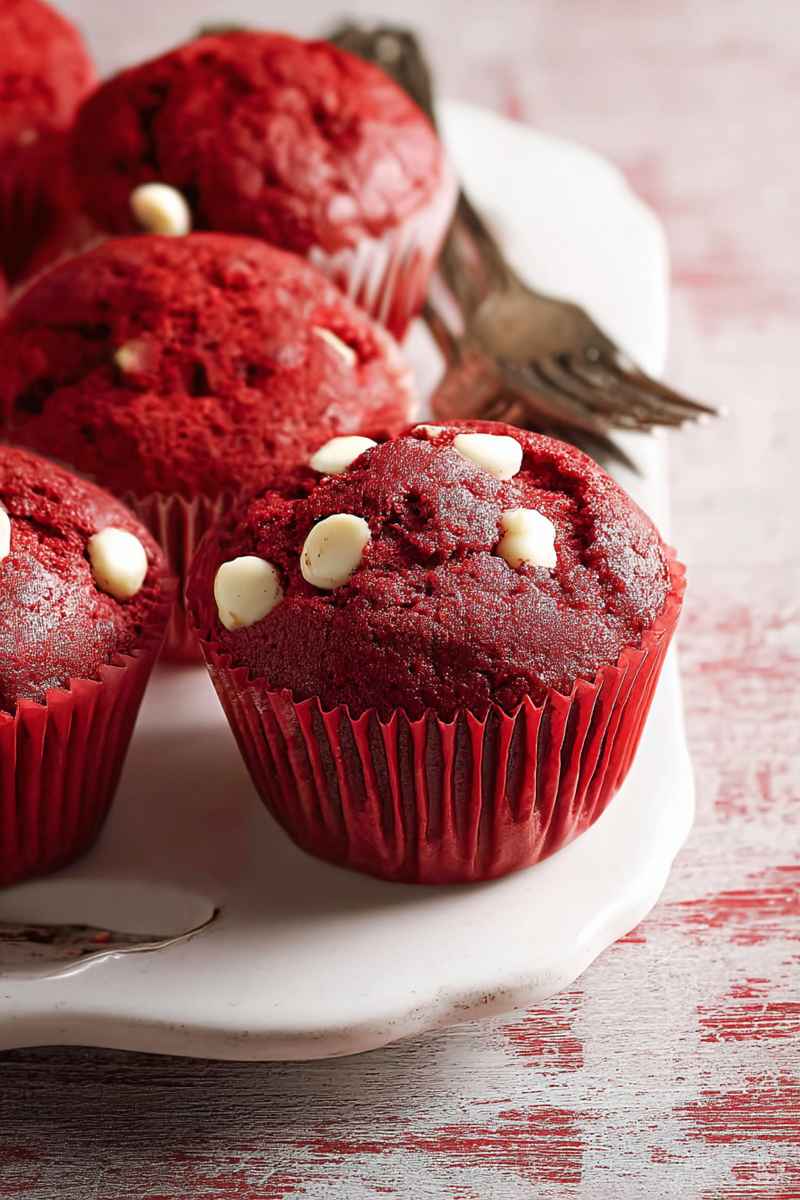
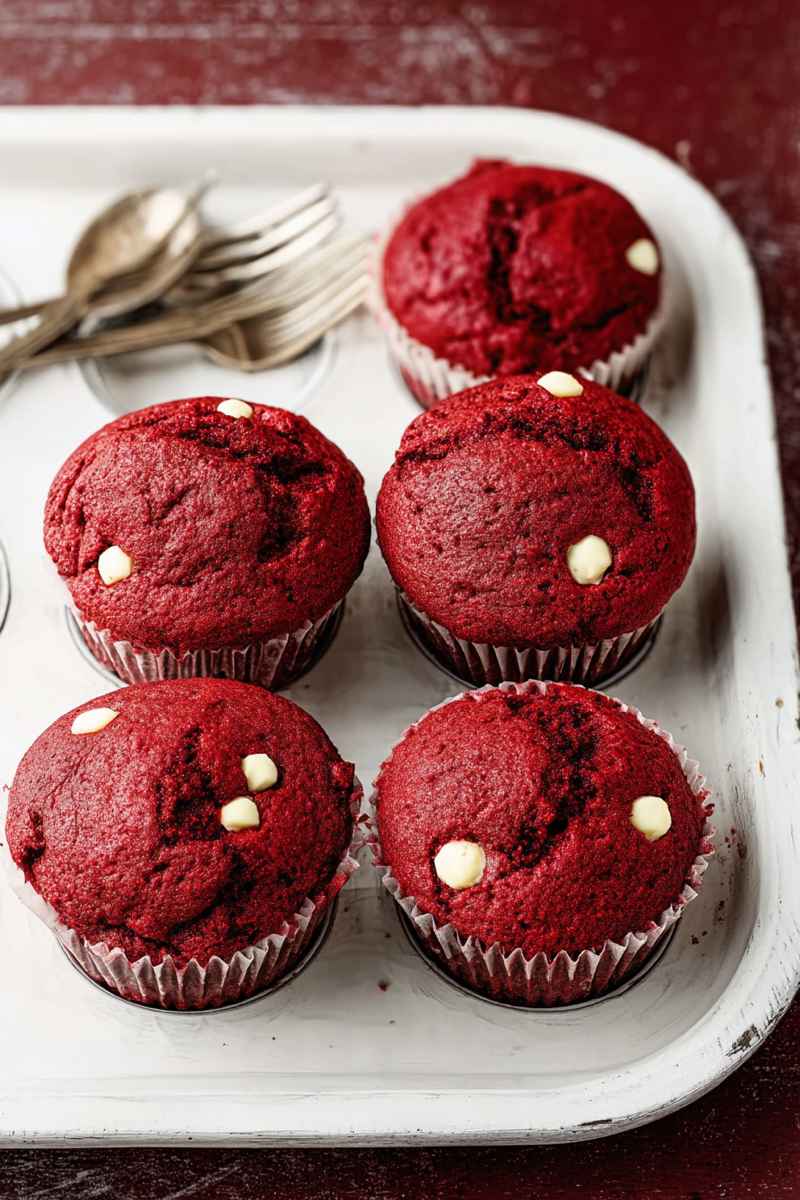
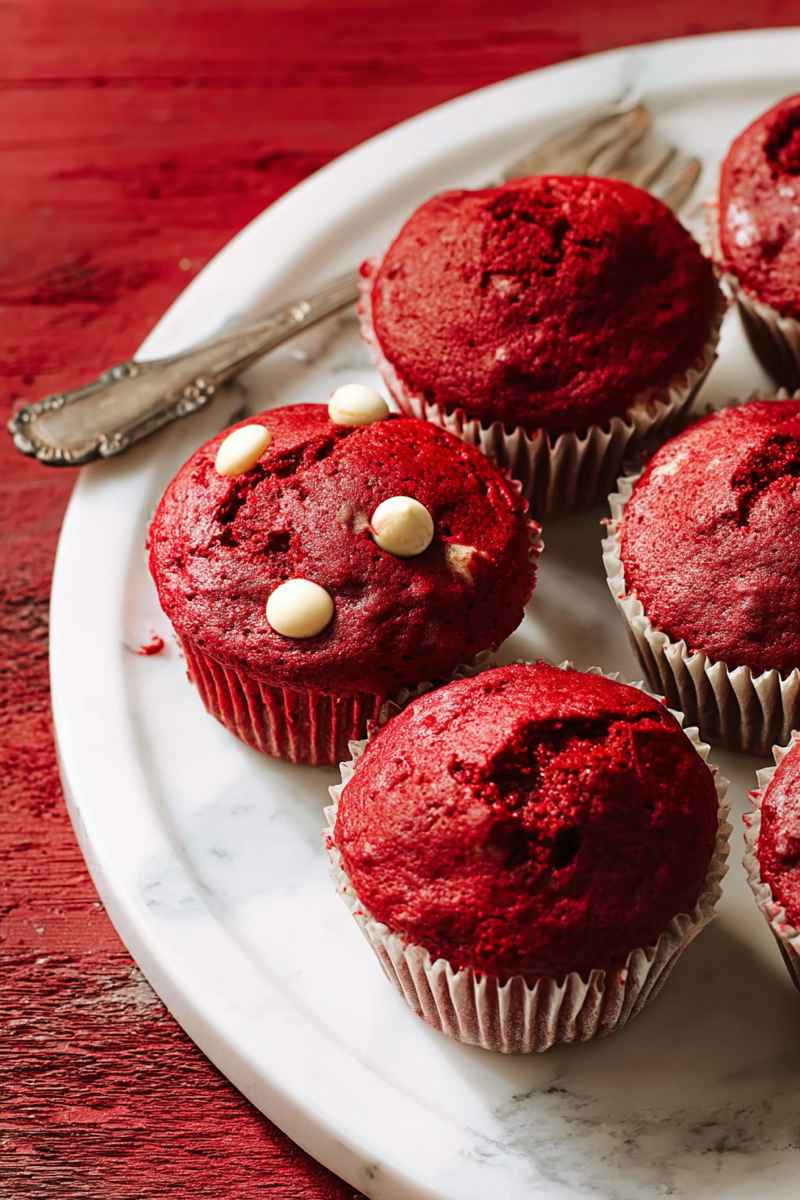
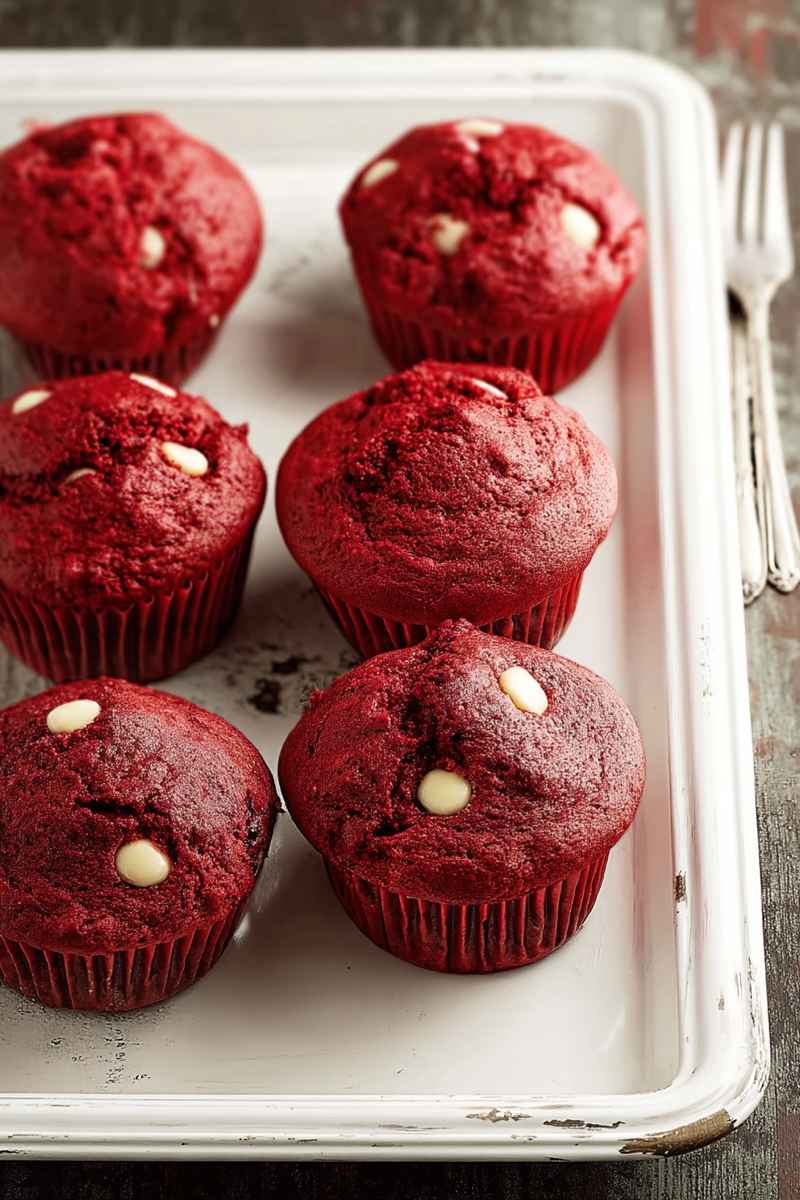
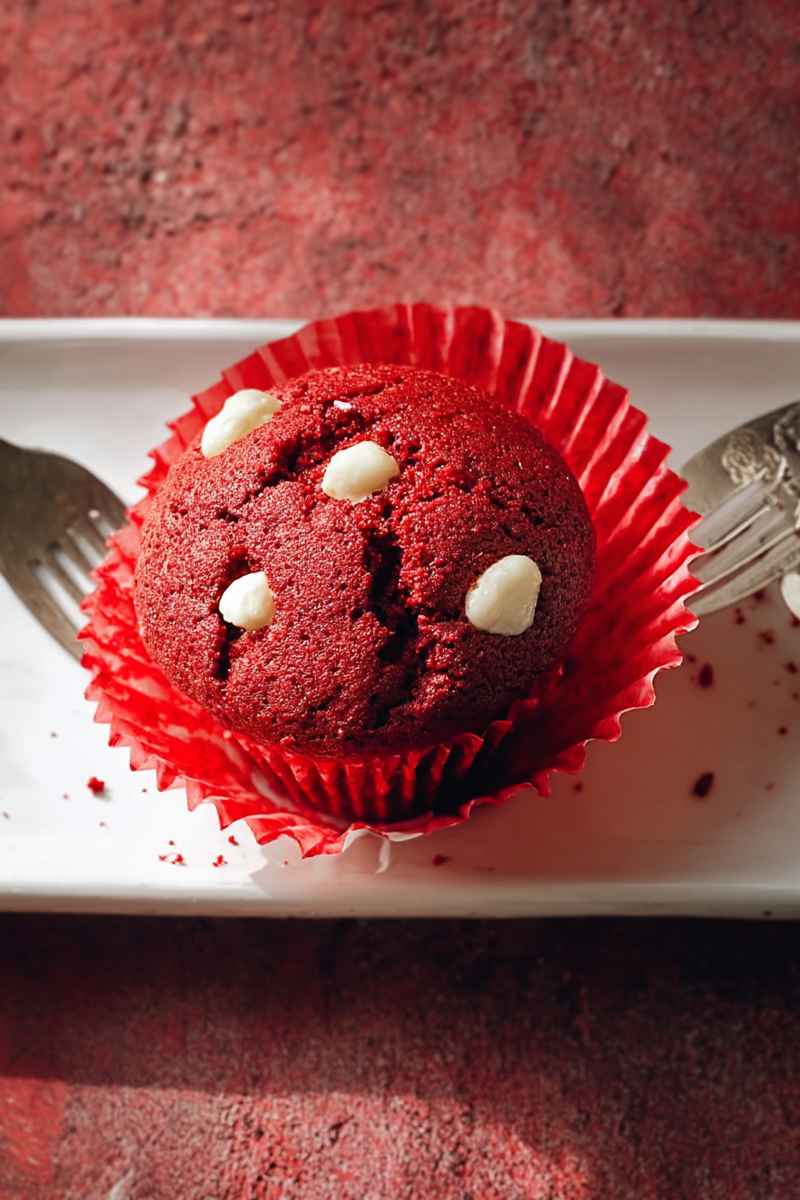
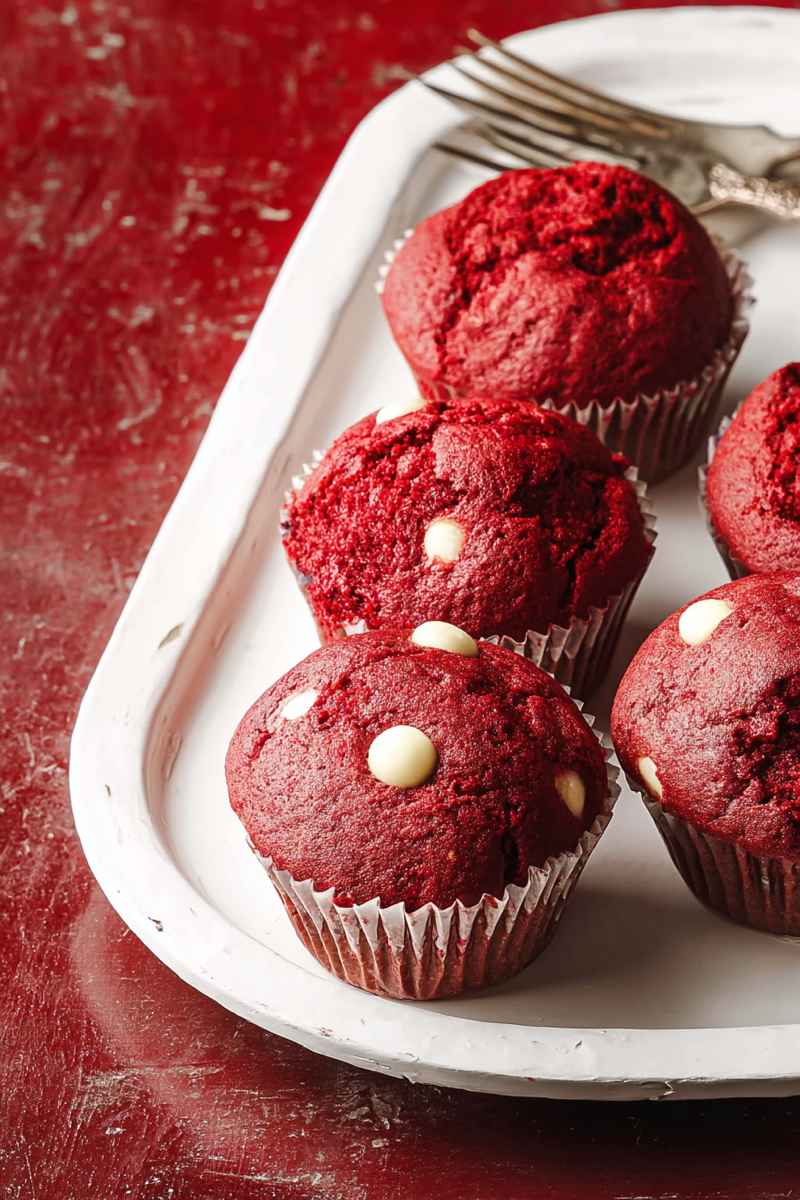
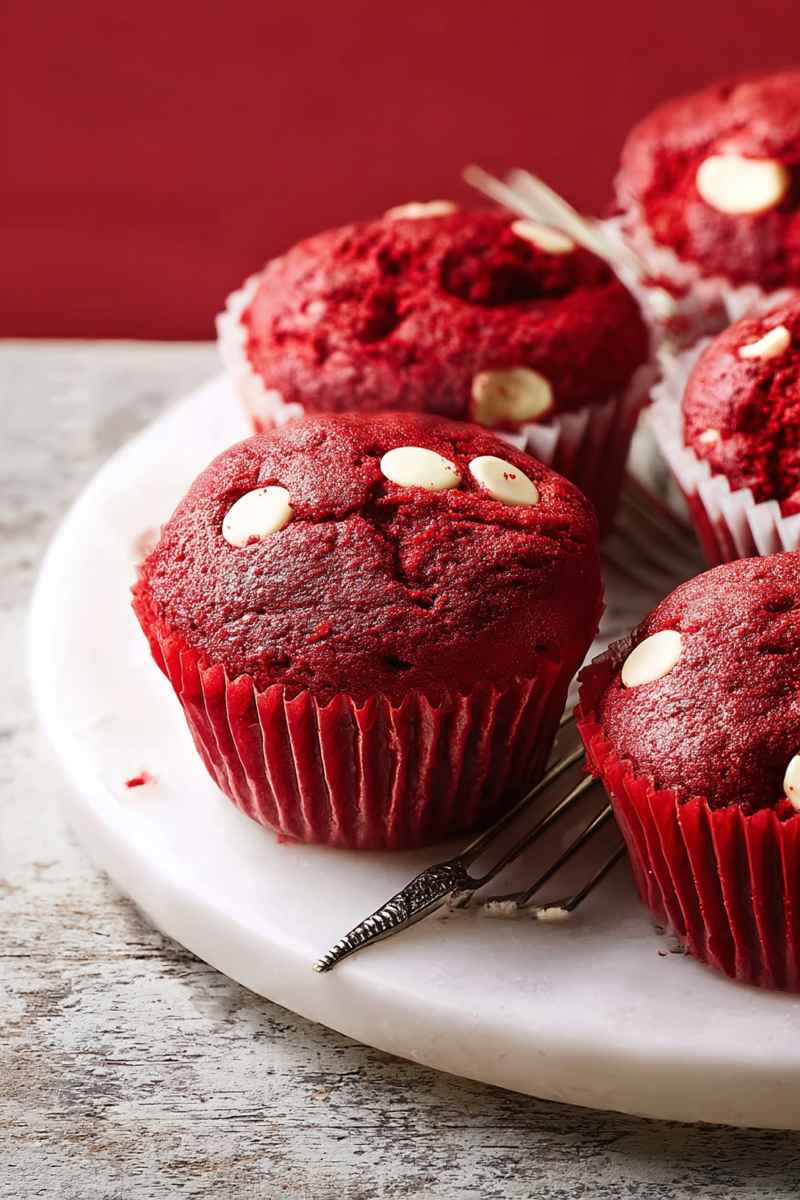
These incredible red velvet muffins are wonderfully soft, supremely tender, and beautifully moist, just like your favorite bakery treat. I wanted to capture that perfect classic red velvet flavor and stunning color in an easy-to-make muffin. They are dotted with sweet white chocolate chips for lovely little bursts of flavor and texture in every bite. These are a perfect quick bake for any morning or special occasion.
Why You Should Bake These Muffins
Red velvet recipes hold a special place in my heart. Recipes like red velvet cake or brownies are favorites of mine, and these simple red velvet muffins are absolutely no different. I truly believe you will adore them for so many wonderful reasons.
- They Offer Perfect Texture: These bakery-style muffins achieve that ideal balance. They are incredibly moist, wonderfully fluffy, and have a delightfully tender crumb. You get all the satisfying texture you want in a muffin while still enjoying the distinct flavor and vibrant appearance of a classic red velvet cake.
- Generous Flavor: These bright red muffins provide a gentle hint of cocoa flavor that is beautifully complemented by a prominent vanilla presence. The delightful addition of sweet and creamy white chocolate chips creates a wonderful contrast and a perfect pairing with the signature red velvet taste.
- Simple Ingredients and Easy Process: Baking these delicious red velvet cake muffins requires only a few common ingredients. You likely have many of them in your pantry right now. We use everyday items like flour, cocoa powder, oil, butter, sugar, eggs, buttermilk, vanilla extract, and of course, red food coloring. The batter comes together very quickly and easily, making them a fantastic treat to whip up for any holiday gathering or simply when you are craving something special.
Ingredients You Will Need
Making these red velvet cake muffins only requires a handful of basic ingredients. Chances are, you already have most of them waiting in your kitchen. Here is a breakdown of what you will need to gather.
- Dry Ingredients: You will need all purpose flour, unsweetened cocoa powder, baking powder, baking soda, and a little salt.
- Wet Ingredients: Get ready to use butter, oil, granulated sugar, large eggs, buttermilk, vanilla extract, red gel food coloring, and white chocolate chips.
Potential Substitutions
Sometimes you might need to make a swap or two when baking. Here are some recommendations if you need to make substitutions for these simple red muffins.
- Flour: I have not tested this recipe using alternative flours like gluten free blends. If you need the muffins to be gluten free, using a good quality 1-to-1 cup all purpose gluten free flour substitute is likely the best option. When using gluten free flour, it is always best practice to measure it by weight rather than cups because gluten free blends can weigh a bit more than traditional all purpose flour. The weight you are aiming for is 245 grams.
- Unsweetened Cocoa Powder: It is generally recommended to use unsweetened natural cocoa powder for classic red velvet recipes. This is because the natural cocoa reacts with the baking soda and buttermilk in the batter, helping to create that signature red hue and tender crumb. It is best not to substitute with Dutch process cocoa powder in this particular recipe because it is processed differently and does not have the same acidic reaction.
- Baking Powder and Baking Soda: Both of these leavening agents are necessary to help these velvet muffins rise properly and achieve that light, fluffy texture. Baking powder provides an initial lift, while baking soda reacts with the acidic buttermilk to create more lift during baking. Do not skip either one.
- Salt: Adding a pinch or two of salt is always a good idea in dessert recipes. It helps to balance the sweetness and enhance the overall flavor of the muffins. It prevents them from tasting flat.
- Unsalted Butter: If you only have salted butter on hand, you can certainly use it. Just be sure to omit the quarter teaspoon of added salt listed in the dry ingredients to avoid the muffins being too salty. If needed, you can also explore using additional oil or a vegan or dairy free butter substitute in the same quantity as the butter called for.
- Canola Oil: Any neutral tasting oil will work wonderfully in this red velvet muffin recipe. Vegetable oil, grapeseed oil, or even a light olive oil are good options that will not impart their own strong flavor to the muffins. The combination of oil and butter helps ensure moisture and tenderness.
- Buttermilk: If you do not have buttermilk readily available, you can easily make a homemade version. Simply add 1 tablespoon of white vinegar or lemon juice to a liquid measuring cup. Then, fill the cup up to the 1 cup line with milk and let the mixture sit undisturbed for about 10 minutes. It will curdle slightly and thicken, creating a good substitute for store-bought buttermilk which provides necessary acidity for the leavening agents and contributes to the tender texture.
- Eggs: This specific muffin recipe has not been tested without the use of eggs. Eggs provide structure, richness, and help bind the ingredients together, contributing to the overall texture and moisture of the muffin.
- Vanilla Extract: Vanilla extract is essential for providing that lovely background flavor that pairs so well with the subtle cocoa and tang in red velvet muffins. It adds complexity and warmth, enhancing the overall taste profile.
- Red Gel Food Coloring: To truly give these velvet muffins that vibrant, striking red color they are known for, I highly recommend using a red gel food coloring. Gel colors are much more concentrated and deliver a deeper, richer color payoff without adding excess liquid to the batter like liquid food coloring can. The recipe works best with gel coloring for achieving that intense hue. However, if you do not mind the muffins having a more muted, reddish tint, you could try using a plant-based food coloring instead.
- White Chocolate Chips: These are completely optional, but they add such a delightful flavor and textural contrast to the muffins. Feel free to use your favorite brand of white chocolate chips. They melt beautifully and add pockets of sweetness. If you prefer, milk chocolate, semi sweet, or dark chocolate chips also work well and taste delicious in these muffins. You could also use chopped white chocolate instead of chips for a potentially smoother melt.
Simple Variations to Try
You can easily adapt this basic red velvet muffin recipe to create slightly different treats. Here are a few simple variations to experiment with.
- Cream Cheese Glaze: For a classic red velvet pairing that is simple and delicious, you can whip up a quick cream cheese glaze. In a medium bowl, whisk together 1 cup of powdered sugar with 4 ounces of room temperature cream cheese and 1 teaspoon of vanilla extract until the mixture is completely smooth and thoroughly combined. Make sure the cream cheese is soft to avoid lumps. Once the muffins have cooled completely on a wire rack, you can generously drizzle this tangy and sweet glaze over the tops of each one using a spoon or by putting it in a piping bag or zip-top bag with a corner snipped off.
- Cream Cheese Filling: You can also add a delicious cream cheese filling inside the muffins for an extra special treat. Prepare and bake the muffins just as the recipe instructs in the steps below. Allow them to cool completely to room temperature first. Using a teaspoon sized scooper or just a regular teaspoon, gently scoop out a small portion from the center of each muffin, going about halfway down into the muffin. Do not go all the way through the bottom. In a separate bowl, mix together 4 ounces of room temperature cream cheese, a quarter cup of heavy cream, half a teaspoon of vanilla extract, and 1 cup of powdered sugar until the filling is smooth, creamy, and well combined. You can then spoon or pipe this lovely filling into the center hole of each muffin, letting it come up slightly above the top to make it visible.
- Mini Red Velvet Muffins: If you prefer smaller, bite-sized treats perfect for sharing or snacking, you can easily turn this recipe into mini muffins. Prepare the muffin batter exactly according to the recipe directions as outlined below. Grease a 24 count mini muffin pan thoroughly, or line it with mini cupcake liners. Use a tablespoon sized cookie scoop to portion the batter evenly into each of the prepared mini muffin wells, filling them about two-thirds full. Bake these mini muffins in a preheated oven at 375 degrees Fahrenheit (190 degrees Celsius) for a shorter time than the standard size muffins, typically 14 to 16 minutes. They are done when the sides look lightly golden and the tops spring back quickly when you gently press them. Cool the mini muffins in the pan for 5 to 10 minutes before carefully removing them. Gently transfer them from the pan to a wire cooling rack to cool completely. Or, if you just cannot wait, you can definitely enjoy one while it is still warm. I suggest using mini chocolate chips for these smaller muffins so the chips are better distributed throughout the tiny muffins.
How to Make These Muffins
Learning how to bake these delightful red velvet muffins is quite simple and only takes a few easy steps. Following this process carefully ensures you get wonderfully moist and flavorful results every single time you bake them.
- Start by preparing your dry ingredients. Get a medium sized mixing bowl and whisk together the all purpose flour, the unsweetened cocoa powder, the baking powder, the baking soda, and the salt. Continue whisking these dry ingredients together until they are thoroughly combined and you do not see any visible clumps of cocoa powder or streaks of leaveners. This initial mixing step is important because it helps distribute the leavening agents and salt evenly throughout the flour mixture, ensuring a consistent rise and flavor in every muffin.
- In a separate, larger bowl, you will combine the wet ingredients. Whisk together the melted butter that has cooled slightly (you do not want it hot enough to cook the eggs), the oil, the granulated sugar, the large eggs, the vanilla extract, and the vibrant red gel food coloring. Whisk everything until all of these wet ingredients are completely well combined and the color is evenly distributed throughout the mixture. The sugar will begin to dissolve slightly, and the mixture will look smooth and a lovely shade of red.
- Now it is time to carefully combine the wet and dry ingredients. Using a fine mesh strainer, you will sift the dry ingredients directly into the bowl with the wet mixture. This sifting helps to aerate the dry ingredients and prevent lumps in the final batter. At the same time that you are adding the dry ingredients, you will also add the buttermilk. It is best to add these in stages, alternating between adding some of the sifted dry mix and some of the buttermilk. A common method is to add about a third of the dry ingredients, then a third of the buttermilk, then repeat, starting and ending with the dry ingredients. Mix everything together very gently until it is just combined. You should mix only until you no longer see streaks of dry flour. It is really important not to overmix the batter at this stage. Overmixing can develop the gluten in the flour too much, resulting in muffins with a tough, chewy texture instead of wonderfully tender ones. A few small lumps in the batter are perfectly fine and often contribute to a tender crumb.
- Once your batter is mixed, cover the bowl. You can use a clean dish towel or a lid designed specifically for the bowl if you have one. Let the batter rest at room temperature for about 30 minutes while you heat your oven. This resting time is a little trick that helps significantly improve the final texture and appearance of the muffins. It allows the gluten in the flour to relax after mixing and gives the dry ingredients time to properly hydrate and absorb the liquids. This hydration process contributes to a more tender crumb and is key to helping create those beautiful, tall, domed bakery-style muffin tops. If you need to rest the batter for longer than 30 minutes, it is best to cover it tightly with plastic wrap to prevent a skin from forming and place it in the refrigerator.
- Plan for that 30 minute resting period for the batter plus enough time for your oven to fully preheat to 375 degrees Fahrenheit (190 degrees Celsius). A properly preheated oven is important for the muffins to rise correctly. Just before you are ready to scoop the batter into your muffin pan, gently fold in the white chocolate chips. Do this carefully using a spatula or wooden spoon so you do not deflate the batter that has been resting. Ensure the chips are relatively evenly distributed throughout the batter.
- When you are ready to bake, prepare your muffin pan or pans. Line 1 or 2 standard size muffin pans with cupcake liners. Using a 3 tablespoon sized cookie scoop is a great way to portion the batter evenly into each lined muffin cup, ensuring similarly sized muffins that bake at the same rate. Fill each liner generously. If you are aiming for those impressively tall, bakery-style tops that spill over slightly, a helpful technique is to fill every other muffin cup in the pan, leaving the spaces in between empty. This allows the heat to circulate more effectively around each individual muffin cup, encouraging better airflow and a higher rise. If you are baking two pans, stagger the muffins in both pans.
- Place the filled muffin pan (or pans) into the preheated oven and bake the muffins at 375 degrees Fahrenheit (190 degrees Celsius) for approximately 18 to 22 minutes. The exact baking time can vary slightly depending on your individual oven. Keep an eye on them during the last few minutes. You can tell the muffins are done using a couple of simple tests. One reliable way is to gently insert a toothpick into the center of one of the muffins in the middle of the pan. It should come out with just a few moist crumbs attached, not wet batter. Another method is to gently press the center of a muffin top with your fingertip. If the top springs back quickly, the muffins are ready to be taken out. If the indentation remains, they need a little more time.
- If you would like to add a few more white chocolate chips to the top of the muffins for decoration and extra indulgence, do this as soon as the muffins come out of the oven while they are still very hot and soft on top. The heat will help them adhere. Let the baked velvet muffins cool in the muffin pan for 5 to 10 minutes. This crucial step allows them to set slightly and become sturdy enough to handle without breaking apart. After this initial cooling period, carefully remove the muffins from the pan. Transfer them to a wire cooling rack to cool completely. Allowing them to cool on a rack ensures air circulates all around them, preventing the bottoms from becoming soggy. Or, if you just cannot wait for that warm, gooey center experience, you can definitely enjoy one while it is still warm from the oven.
How to Properly Store, Freeze, and Thaw
Once these delicious red velvet muffins have cooled, you will want to know how to keep them fresh. Proper storage ensures they stay moist and tender for as long as possible. Here is how I recommend storing, freezing, and thawing your homemade muffins.
Storing Them Fresh
To keep your red velvet muffins fresh at room temperature, place them in an airtight container. Make sure the container seals well to prevent them from drying out. Stored this way, they will generally keep well for up to 5 days. You can place them in a single layer or stack them gently with parchment paper in between layers if needed.
It is important to note that if you choose to add a cream cheese filling or glaze to your muffins, they will need to be stored in the refrigerator for the entire 5 days. Cream cheese is a dairy product and should not be left at room temperature for extended periods for food safety.
Freezing Muffins
If you want to save some muffins for later or have baked a large batch, freezing is a great option. Make absolutely sure the muffins are completely cooled to room temperature before you attempt to freeze them. Freezing warm muffins can cause condensation inside the packaging, leading to ice crystals and soggy texture.
To freeze, individually wrap each muffin tightly in plastic wrap. Make sure it is sealed well with no gaps. This initial wrap helps prevent freezer burn. After wrapping individually, place all the wrapped muffins into a large ziplock freezer bag or another airtight freezer safe container. Remove as much air as possible before sealing. Stored properly in the freezer, these muffins will keep well for up to 2 months.
Thawing Frozen Muffins
The easiest and often tastiest way to thaw your homemade red velvet muffins after they have been frozen is to simply let them sit out at room temperature. Take them out of the freezer bag and unwrap the plastic wrap. Place them on a plate or cooling rack. They should take at least two hours to thaw completely, depending on the temperature of your room.
Once thawed to room temperature, you can enjoy them as they are. If you want that lovely “fresh from the oven” taste and warmth, you can microwave an individual muffin for about 20 to 30 seconds. Be careful not to overheat, or they can become tough. This quick warming brings back some of that wonderful soft texture.
My Expert Tips for Perfect Muffins
Over the years of baking muffins, I have picked up a few tricks that really make a difference. These simple tips can help you get the best possible results with your red velvet muffins, giving you that true bakery style quality right from your own kitchen.
- Always Use Cupcake Liners: While it might be tempting to skip them, I highly recommend using cupcake liners for these muffins. Even with liners, a tiny bit of muffin might stick sometimes, but they are significantly easier to remove from the pan when they are baked in liners. Plus, they look so much nicer and are easier to handle and transport.
- Bring Cold Ingredients to Room Temperature: This step really does matter. Making sure ingredients like your eggs and buttermilk are at room temperature allows them to mix together much more evenly with the other ingredients. They emulsify better, creating a smoother batter. This leads to a more consistent texture in the final baked muffin. Plan ahead and take them out of the fridge about 30 to 60 minutes before you start mixing.
- Opt for Red Gel Food Coloring: To achieve that truly vibrant, deep red color that is characteristic of classic red velvet, using red gel food coloring is key. Gel colors are concentrated and provide intense color without adding excess liquid to your batter. Liquid food coloring requires using more to get a strong color, which can sometimes throw off the liquid balance in the recipe. A good quality gel color makes all the difference for that stunning visual appeal.
- Be Careful Not to Overmix the Batter: This is one of the most crucial tips for tender muffins. Once you add the dry ingredients to the wet, mix them together by hand using a spatula or wooden spoon. Mix only until the ingredients are just combined and you no longer see streaks of dry flour. Stop there. Overmixing develops the gluten in the flour too much, resulting in muffins that are tough and chewy instead of light and tender. A few small lumps are perfectly okay.
- Rest the Batter While the Oven Preheats: This is my absolute favorite little trick for getting those gorgeous, high, domed bakery style tops on muffins. Allowing the batter to rest for about 30 minutes while your oven comes up to temperature is incredibly beneficial. This resting time allows the gluten in the flour to relax after mixing. More importantly, it gives the dry ingredients time to properly hydrate and absorb the liquid. This hydration thickens the batter slightly and allows it to rise better and more evenly when it hits the hot oven, resulting in taller, more tender, and beautifully moist muffins.
Frequently Asked Questions
Here are some common questions people ask about making red velvet muffins, along with some helpful answers.
Red velvet flavor is a unique and delightful balance. It typically combines a subtle hint of cocoa with a more pronounced vanilla flavor. There is also a characteristic slight tanginess, which traditionally comes from the reaction between the buttermilk and vinegar often used in the recipe. The chemical reaction between the acidic buttermilk and cocoa powder (which is naturally acidic) and baking soda also contributes to the fine, velvety texture that gives the cake or muffin its name.
Several factors contribute to a wonderfully moist muffin. One key is using fat in the recipe, like butter and oil, as this recipe does. Ingredients like buttermilk or sometimes sour cream or full fat yogurt also add moisture and richness. Not overmixing the batter is also critical because developing too much gluten can lead to a dry, tough texture. Baking them just until they are done and not overbaking also ensures they retain their moisture.
Yes, absolutely! When possible, letting your muffin batter rest before baking will almost always give you better tasting and better textured muffins. As mentioned in my tips, resting allows the gluten to relax, which makes the muffins more tender. It also gives the dry ingredients time to fully hydrate, resulting in a more uniform crumb, increased moisture, and importantly, helps the muffins rise taller and more evenly in the oven. Even a short 15-30 minute rest can make a noticeable difference.
You certainly can make these muffins without adding red food coloring. They will taste exactly the same, with that classic blend of subtle cocoa, vanilla, and tanginess. However, they will not have the characteristic vibrant red color. They will likely be a pale reddish-brown due to the cocoa powder. So, if the color is not important to you, feel free to omit the food coloring.
For traditional red velvet recipes that use baking soda and buttermilk, it is generally recommended to use unsweetened natural cocoa powder. Natural cocoa powder is acidic. It reacts with the alkaline baking soda and the acid in the buttermilk to help the cake rise and achieve that signature fine, tender crumb and reddish hue (when combined with food coloring). Dutch process cocoa powder has been treated to neutralize its acidity and will not react the same way with the leavening agents in this specific type of recipe.

Best Red Velvet Muffins (Moist & Easy Recipe)
- Prep Time: 10 minutes
- Cook Time: 18 minutes
- Total Time: 28 minutes
- Yield: 12 muffins
- Category: Muffins
- Method: Oven
Description
These Red Velvet Muffins are incredibly soft, tender, and moist bakery style treats that capture the decadent flavor and beautiful color of classic red velvet cake. They are studded with sweet white chocolate chips for a perfect burst of contrasting flavor and texture!
Ingredients
- 2 cups (240 grams) all purpose flour
- ¼ cup (20 grams) unsweetened cocoa powder
- 2 teaspoons baking powder
- ¼ teaspoon baking soda
- ½ teaspoon salt
- ¼ cup (60 ml) neutral baking oil, such as canola or vegetable
- ¼ cup (60 grams) unsalted butter, melted and cooled slightly
- 1 cup (200 grams) granulated sugar
- 2 large eggs, at room temperature
- 1 to 2 teaspoons red gel food coloring, depending on desired color intensity
- 2 teaspoons vanilla extract
- 1 cup (240 ml) buttermilk, at room temperature
- 1 cup (170 grams) white chocolate chips
Instructions
- In a mixing bowl, whisk the flour, cocoa powder, baking powder, baking soda and salt together. Make sure they are fully combined.
- In a separate bowl, whisk together the melted and cooled butter, oil, granulated sugar, eggs, vanilla extract and red gel food coloring. Whisk until everything is well mixed.
- Sift the dry ingredients into the wet ingredients using a mesh strainer. Add the buttermilk at the same time, alternating between the dry mix and the buttermilk. Start and end with the dry ingredients. Mix everything together until it is just combined. Do not overmix.
- Cover the bowl with a clean dish towel or a lid. Let the batter rest at room temperature while you heat the oven to 375 F (190 C). This resting time helps the gluten relax and the ingredients hydrate. If you rest the batter for longer than 30 minutes, put it in the fridge. Cover it with plastic wrap in the fridge.
- Plan for 30 minutes of resting time for the batter and time for the oven to preheat. Fold the white chocolate chips into the batter after it has rested. Do this right before you scoop the batter into the muffin pan.
- When you are ready to bake, line 1 or 2 muffin pans with cupcake liners. Use a 3 tablespoon size cookie scoop to put the batter into each lined muffin cup. To get tall, bakery style tops, fill every other muffin cup.
- Bake the muffins at 375 F (190 C) for 18 to 22 minutes. The muffins are done when a toothpick poked into the center comes out with just a few moist crumbs. Another way to check is to gently press the center of a muffin. If it bounces back quickly, they are ready.
- If you want to add more white chocolate chips to the top, put them on as soon as the muffins come out of the oven. Let the velvet muffins cool in the muffin pan for 5 to 10 minutes. Carefully take the muffins out of the pan. Let them cool completely on a cooling rack or enjoy them warm.
Notes
Storage: Place the red velvet muffins in an airtight container. They will keep at room temperature for up to 5 days. If you add a cream cheese filling to your muffins, you will need to store them in the fridge for all 5 days.
Variations: You can make these red velvet muffins with a cream cheese filling or a cream cheese glaze. You can also make them as mini red velvet muffins. Details for these variations are available in the full blog post.
Nutrition
- Serving Size: 1 muffin
- Calories: 350
- Sugar: 32g
- Sodium: 200mg
- Fat: 15g
- Carbohydrates: 49g
- Fiber: 1g
- Protein: 4g
- Cholesterol: 45mg